
Create App Overlays
PolyKybd can draw a shortcut icon on each keycap OLED for whichever app is focused — see Context-Aware Overlays for the user-facing side. This HowTo builds a new overlay set for an application by hand, the same way the shipped overlays were made.
An overlay is just an image you paint in an editor like GIMP, plus a
one-line entry telling the host which app it belongs to. The editable source files for every
built-in overlay live in the host repo under
polyhost/res/overlays/src/ —
a great starting point (and template.xcf there is a blank grid). The authoritative format spec is
polyhost/res/overlay_specification.md.
How an overlay image is laid out
Section titled “How an overlay image is laid out”The host loads one or two PNGs per app. Each PNG is a 720×360 image = a 10×9 grid of 72×40 keycap cells, in row-major key order, and — this is the clever part — each colour channel of a cell is a different modifier variant of that key:
| File | Red | Green | Blue | Alpha |
|---|---|---|---|---|
*.mods.png (primary) |
Ctrl | Alt | Shift | no modifier |
*.combo.mods.png (combo) |
Ctrl+Shift | Ctrl+Alt | Alt+Shift | GUI |
*.extra.mods.png (extra) |
Ctrl+Alt+Shift | GUI+Shift | GUI+Alt | GUI+Ctrl |
*.gui.mods.png (GUI combos) |
GUI+Ctrl+Shift | GUI+Alt+Shift | GUI+Ctrl+Alt | GUI+Ctrl+Alt+Shift |
*.png (plain) |
— | — | — | grayscale → no modifier only |
So one RGBA image holds four layers of the same keyboard at once — you can see it in GIMP’s Channels panel, each of Red / Green / Blue / Alpha carrying the icons for a different modifier:
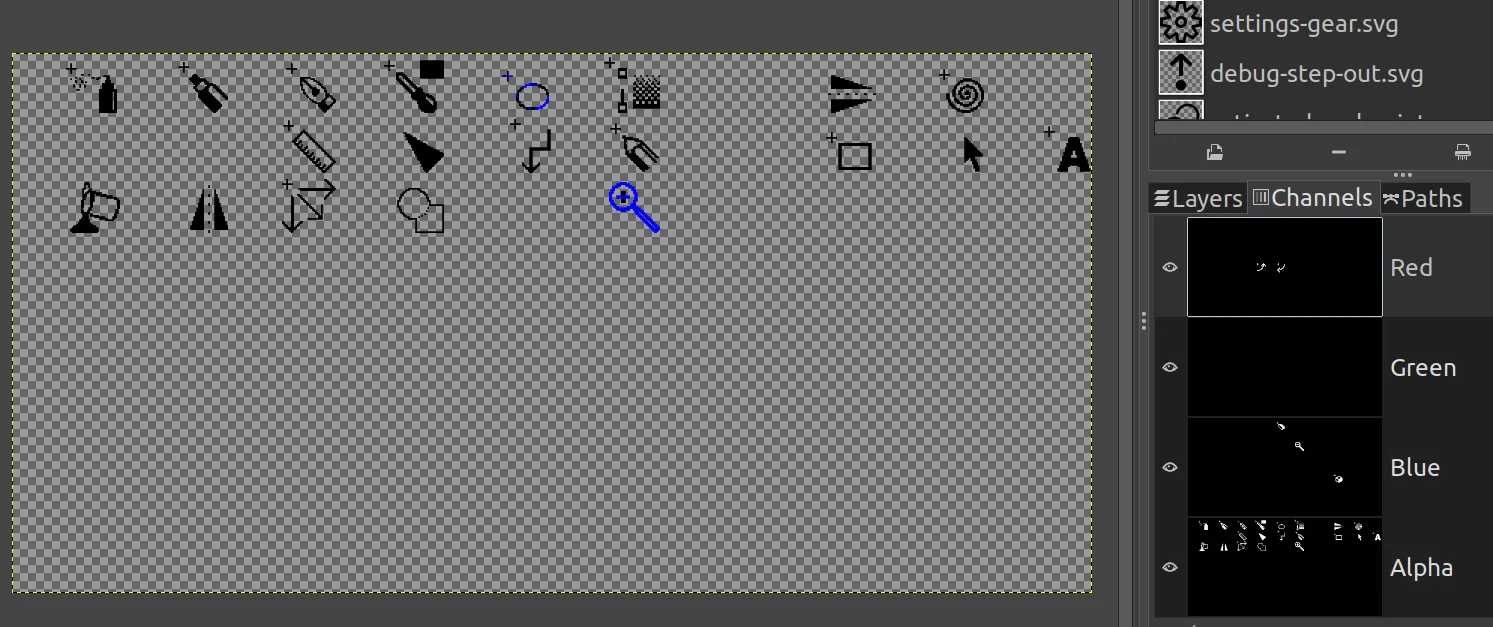
White pixels are drawn (lit) on the OLED; everything else is ignored. Encode as straight (non-premultiplied) RGBA — a transparent pixel must still carry its R/G/B bytes, because those channels are the Ctrl/Alt/Shift variants, independent of alpha (see the export step below).
A few hard limits baked into the firmware — don’t fight them:
- All sixteen modifier combinations work — every mix of Ctrl, Shift, Alt and GUI. Until
recently GUI could not be combined with another modifier:
GUI+Shift,GUI+Altand so on all drew the plain GUI icon instead of their own. That mattered most on macOS, whereCmd+Shiftchords are everywhere (Cmd+Shift+Popens the command palette in a lot of editors). If you skipped those shortcuts before, you can draw them now — see theextraandGUI combosrows above. - Repeating the same icon across several variants is free: the host spots byte-identical images and stores them once on the keyboard, so only genuinely different artwork costs space.
- Cells are 72×40, 1-bit monochrome on the OLED — draw simple, high-contrast icons.
- Only the 90 mapped keys carry a cell (
A–Z,0–9,F1–F12, punctuation, the nav cluster, modifiers). Keypad and media keys have none. - Put the icon in the bottom-right of the cell so it never covers the firmware-drawn key letter in the top-left.
Build it by hand
Section titled “Build it by hand”-
Start from the template. Copy
polyhost/res/overlays/src/template.xcf(the blank 720×360 grid) — or an existing app’s…_template-RGBA.xcfthat’s close to what you want — and open it in GIMP. Working from a shipped source is the quickest way to see how the channels and cell grid are organised. -
Look up the app’s real shortcuts. From the app’s own menus, help, or shortcut reference. Note the modifier each one uses — every combination of Ctrl, Shift, Alt and GUI can be drawn, so nothing has to be dropped for lack of a channel.
-
Draw an icon per shortcut. For each shortcut, place a small, clear icon into that key’s cell, on the channel for its modifier (Ctrl → red, Alt → green, Shift → blue, no-modifier → alpha). Keep it bottom-right. Reuse of the app’s own iconography reads best; simple monochrome art survives the 1-bit OLED far better than a detailed logo.
-
Export the PNG(s). Export the image to
polyhost/res/overlays/<app>_template.mods.pngas 720×360 RGBA. Add each further tier only if you drew for it —<app>_template.combo.mods.pngfor the combo layers (Ctrl+Shift / Ctrl+Alt / Alt+Shift / GUI),<app>_template.extra.mods.pngfor Ctrl+Alt+Shift and the two-modifier GUI chords, and<app>_template.gui.mods.pngfor the three- and four-modifier GUI chords. Most apps never need that last one. If you only need plain, unmodified icons, a single grayscale<app>_template.pngis enough. -
Tell the host which app it’s for. Add an entry to
polyhost/res/overlay-mapping.poly.yaml, keyed on the app’s window class / process name (comma-separate aliases), pointingoverlay:at your PNG(s):myapp,myapp.exe:overlay: [myapp_template.mods.png, myapp_template.combo.mods.png]When one process serves many contexts (a browser hosting several web apps, an IDE), narrow it with a sub-map. The host tries them in a fixed order and the first match wins:
Key Matches on How urls-contains:the focused tab’s URL plain substring titles-startswith:the first word of the title whole word titles-endswith:the last word of the title whole word titles-contains:any word in the title whole word chrome,google-chrome,chromium:overlay: [chrome_template.mods.png] # plain browsingurls-contains:atlassian.net: { overlay: [jira_template.mods.png] }titles-contains:Jira: { overlay: [jira_template.mods.png] } # used when no URL is knownSee the existing Chrome and JetBrains entries for the full pattern.
If the app’s shortcuts differ per platform, give it an
os:branch. Sublime Text does exactly this —Cmdon macOS,Ctrlelsewhere:sublime_text:overlay: [sublime_template.mods.png, sublime_template.combo.mods.png] # the defaultos:macos:overlay: [sublime_mac_template.mods.png, sublime_mac_template.combo.mods.png,sublime_mac_template.extra.mods.png, sublime_mac_template.gui.mods.png]Accepted keys are
windows,macos,linux, pluslinux_gnome/linux_kdewhen a desktop environment needs its own artwork (a plainlinux:branch still covers those two). Anything the host can’t identify falls back to the entry’s ownoverlay:, so the default is never skipped.One file for both platforms:
Section titled “One file for both platforms: CMDCTRL”CMDCTRLWriting the two sets by hand means maintaining the same shortcut list twice, and they drift. Instead, a binding file for
scripts/generate_app_overlays.pycan useCMDCTRL— the OS-relative command modifier,Ctrlon Windows/Linux andCmdon macOS:bindings:- { key: P, mods: [CMDCTRL, SHIFT], icon: palette.png, label: command palette }One spec, two artwork sets: the generator renders
<output>.*withCMDCTRLas Ctrl and<output>_mac.*with it as Cmd, then emits theos: macos:branch selecting between them. SpellingsCMDCTRL,CMD_OR_CTRLandCMDORCTRLall work — GTK calls the same idea<Primary>and Electron calls itCmdOrCtrl.A plain
CTRLbinding stays literal Ctrl on every platform, which matters: macOS keeps real Ctrl chords of its own, and apps do too. Both spellings coexist in one file.When one platform diverges:
Section titled “When one platform diverges: only: / except:”only:/except:CMDCTRLsplits Windows from macOS — but Windows and Linux share one PNG, so an action an app remaps on only one of them has nowhere to go. Two optional keys scope a binding to the platforms it is actually correct on:bindings:# Right on Windows and macOS; Linux moves this one to a two-stroke chord.- { key: U, mods: [CMDCTRL, SHIFT], icon: output.png, label: Output, except: [linux] }# The other shape: one icon, a different chord per platform.- { key: LEFT, mods: [ALT], icon: goback.png, label: Go back, only: [windows, macos] }- { key: "-", mods: [CTRL, ALT], icon: goback.png, label: Go back, only: [linux] }Valid platforms are
windows,macosandlinux. A binding with neither key applies everywhere — which is every binding in every other example on this page, so scoping is opt-in and nothing you have already written changes. Useonly:orexcept:, never both.VS Code’s Show Output is the real case:
Ctrl+Shift+Uon Windows and⇧⌘Uon macOS, but Linux moves it to the chordCtrl+K Ctrl+H(Ubuntu reservesCtrl+Shift+Ufor unicode input), which a keycap cannot draw at all. Scoping it out leaves Linux a blank key instead of a wrong one, while Windows and macOS keep the icon — deleting the binding would have cost all three.A third artwork set (
<output>_linux.*, plus a matchingos: linux:branch) is generated only when a binding actually distinguishes Linux from the default. Both scoped bindings above do —except: [linux]drops one there, and theonly:pair puts Go back on a different key — so that spec gets one.CMDCTRLalone never does, since it isCtrlon Windows and Linux alike: an app that scopes nothing keeps emitting exactly the two sets it always did. -
Test it. Focus the app with the keyboard connected — the overlay loads automatically. Run PolyKybdHost with
--dev 2to watch the overlay HID traffic if a key doesn’t show.
See Contributing for how to open the pull request, and Display Graphics & Fonts for how overlays are rendered on the device.